


| The following article provides a general introduction to spring driven clocks. You will find other articles of interest at the bottom of this page. |
The American Spring-Driven Mantel Clock
by Dave Coatsworth
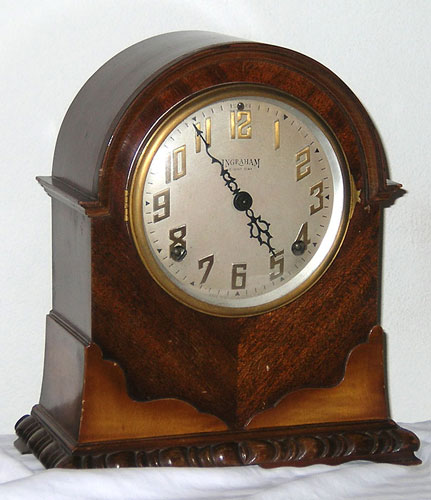
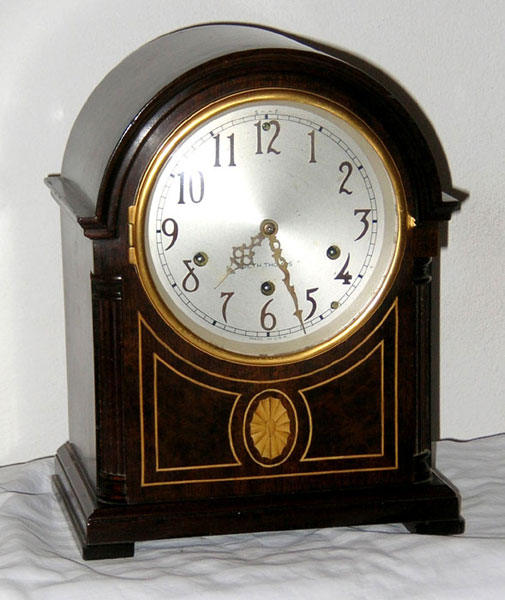
From the point where they became affordable to the average family (1850-60) to the time where many of the American clock companies went out of business (pre-WWII) the styles of American mantel clocks changed significantly. On the other hand, the basic mechanics (i.e., the movement) of the mantel clock did not change much at all. Therefore, the same basic instructions for using and caring for your antique American mantel clock will apply to the vast majority of them.
From a mechanical point of view, there are a few different types of clock movements.
- Time Only - This is the simplest type of movement. It has a single 'train' of 4 gears (wheels). Clocks with a 'time only' movement will only tell the time. Most of these clocks will only have one winding hole.
- Time and Strike - Time and strike movements have two trains. One train is the same as the 'time only' movement and is responsible for keeping the time. The second train drives the 'strike' which will strike the hours on the hour. (Strike trains will sometimes also strike a single strike on the half hour.) These clocks will have two winding holes.
- Chiming - Chiming movements usually have three trains. Two are the same as the 'time and strike' movement. The third train will play a melody on the quarter hours. The most common melody is the Westminster chimes. Some chiming clocks can play different melodies and will offer options such as Whittingham and St. Michael's chimes. Chiming clocks will play one-quarter of the complete melody on the quarter hour, one-half of the melody on the half hour, three-quarters of the melody on the three-quarter hour and the full melody on the hour. After the melody plays on the hour, the strike train will then strike the number of hours. These clocks usually have three winding holes, although there are exceptions that only have two.
- Alarm - Some earlier mantel clocks had an alarm feature that you could set to go off at the same hour twice a day. On these clocks, you will see a brass wheel with the hours behind the hands and an extra, small movement inside.
Among these different types of clock movements, there were 2 main mechanisms used to regulate the timekeeping of the clock.
- Pendulum - These movements employ a pendulum which moves back and forth a specific number of times per minute. The action of the pendulum regulates how fast the escape wheel and, therefore, the rest of the train can move. As the effective length of the pendulum becomes longer, the number of beats per minute decreases.
- Balance Wheel - These movements employ a balance wheel mechanism, similar to what is used in a watch, to regulate the time. Balance wheels were typically used in lower cost clocks. Timekeeping is regulated by lengthening or shortening the effective length of the hairspring.
The earliest mantel clocks only ran for 30 hours and had to be wound every day. The most common mantel clocks were '8 day' clocks and had to be wound weekly. If you have an 8-day clock, it is a good idea to get in the habit of winding it at a specific time each week. Many people choose either Sunday morning or Sunday Night.
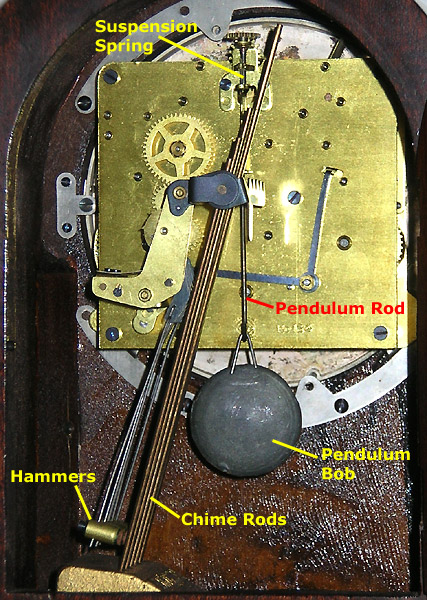
If you look at the movement of a spring driven clock, you will see springs coiled around the arbors of the great wheels, as in the photo below. Occasionally these springs will break and will need to be replaced. This is a job best left to a professional clock repairer. These springs store a tremendous amount of energy and can cause injury if not removed and installed with the proper procedure and tools.
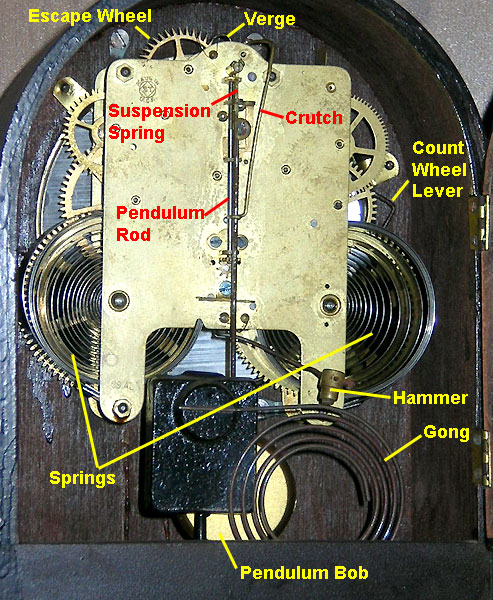
The photo below shows some of the basic parts of a chiming clock movement.
The following are a set of tips which, if followed, should provide you with many years of enjoyment from your antique mantel clock.
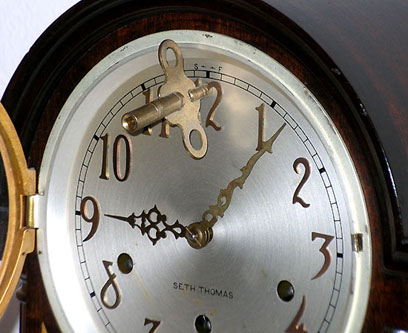
- Winding - Regardless of how often your clock needs winding, it is important to wind it correctly. Don't force anything. The most common American time-and-strike clocks have two winding holes, as shown below. In this case, the two springs are wound in opposite directions. The arbor on the left is wound in a clockwise direction and the one on the right is wound in a counter-clockwise direction. Again, there are exceptions, so don't force the winding in a particular direction if it does not want to go that way. Chiming clocks will have three winding arbors. In a majority of these, the springs all wind in the same direction - clockwise. Many people are afraid to 'overwind' their clocks. Again, the key is to not force anything. When your clock approaches the fully wound state, you will feel the effort to wind it increase and you will hear the sound of the spring coils rubbing against each other as they become tightly wound around the arbor. Stop at this point. If you wind your clock to this point but find that it will not run for a full 8 days, it may be time to have your clock serviced, which should include replacing the springs.
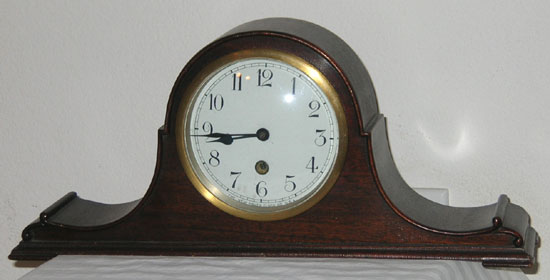
- Level - For accurate timekeeping, it is important that your clock be level side-to-side. Level front-to-back is not as critical, unless the clock is so unlevel that the pendulum bob rubs on the movement or case. A few clocks, such as the Ansonia pictured above, incorporated levels in the face or case, but this is rare. When you set your clock up, you should place a small level on a horizontal part of the case to make sure it is level. If it is not, place a shim under the side that is low. A good 'shim' that almost everyone has on hand is a pad of small post-it-notes. Just split the pad at about the right height and put it under the low side. You can make minor adjustments by adding or removing one or more sheets from the pad.
- Beat - With the clock leveled, you should now have a perfect 'beat'. Listen to the sound your clock makes. It should be a nice, even 'tick-tock-tick-tock-tick-tock' with even spacing between each 'tick' and 'tock'. This is called being 'in beat' and will provide you with the best timekeeping. If your clock sounds more like 'tick-tock- - - tick-tock- - -tick-tock', your clock is out of beat. On movements that have a crutch, this is most likely caused by the crutch being bent out of it's correct shape. A 'non invasive' way to partially correct this problem would be to change the side-to-side leveling of the clock until the tick-tock becomes even again. If you do so carefully, you can also bend the crutch so that the pendulum is perfectly centered when the clock is not running. This should improve the beat. There are other problems that could cause a clock to be out-of-beat, but these problems should be taken care of by a qualified clock repairer.
- Adjusting the timekeeping - Timekeeping is regulated by the pendulum. If you lengthen the effective length of the pendulum, the clock will slow. If you shorten it, the clock will run faster. On most American mantel clocks, the effective length of the pendulum is adjusted in one of two ways.
Some clocks have a small hole, usually above the '12', into which the small end of the key will fit. Turning the key counter-clockwise will cause the clock to run slower. Turning it clockwise will cause the clock to run faster. Turning this arbor raises or lowers a regulator into which the suspension spring fits. Lowering this regulator effectively shortens the pendulum because only the portion of the suspension spring below the regulator 'counts' in the pendulum's effective length. Raising this regulator has the opposite effect.
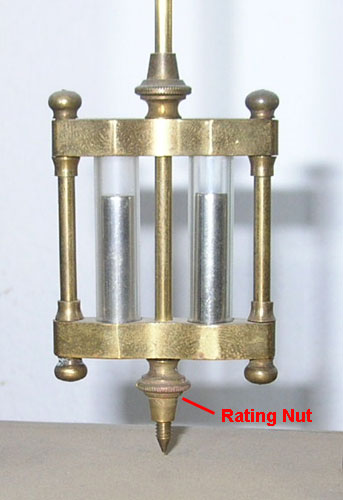
On other clocks, the pendulum bob is on a threaded rod and rests on a nut. This nut is called a 'rating nut'. By raising or lowering this nut, you raise or lower the bob, thus effectively changing the length of the pendulum.
In adjusting your clock by either of these methods, do so in small increments, such as half a turn. You will be surprised how small of a change is necessary to see a noticeable change in the timekeeping of the clock.
- Servicing - If your clock is in continuous use, you should have it serviced much as you would have your car serviced. For the most part, clocks should be oiled every 2 years. This means getting to all of the pivot holes and applying the proper amount of oil. (Too much oil can be just as bad as not enough.) Clock movements should be overhauled every ten years. A proper overhaul requires disassembly of the movement, polishing pivots if necessary, rebushing any worn pivot holes, re-assembly, and oiling. It is certainly possible to run a clock for many years without following these guidelines, but oil dries and dirt in the movement turns into an abrasive, accelerating the wear and tear on the movement.
- No WD-40 - If your clock has not been serviced in many years and the oil has dried in the pivots, you may be tempted to give it a shot of WD-40. Don't! This may indeed get it running again. However, WD-40 is not a proper lubricant and will lead to much more wear and damage in the long run. If you have not run a clock for several years, it should be properly cleaned and oiled before it is run. If WD-40 has been used on a clock, it is likely that your servicing bill will be higher than if it were not.
- Remove pendulum bob before moving - If you wish to move your clock to a different location, always remove the pendulum or pendulum bob before moving the clock. Attempting to move the clock with the pendulum bob attached could damage the suspension spring.
- Setting the time - To set the time on an antique clock, move the minute hand forward (clockwise). Some clocks will allow the time to be set by moving the hands backward, but it is best to assume that you should always move the hands forward. Slow down as you approach the '55' minute mark on striking/chiming clocks. You will hear a click or clunk and should move slowly enough for this to happen. This is called the warning. Continue to move slowly to just past the top of the hour and allow the striking/chiming to run its course. When it is finished, continue to move the minute hand forward, as necessary.
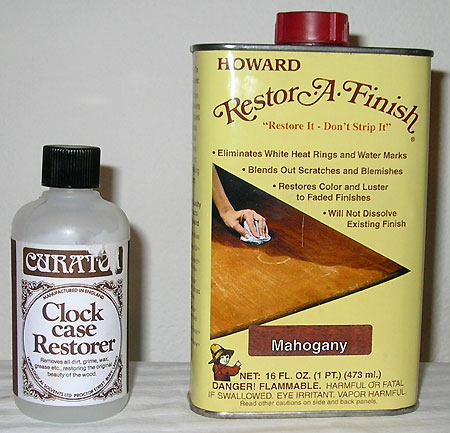
- Resist the urge to refinish - Unless the finish on your clock is completely ruined, resist the urge to refinish it as this can have a significant impact on the value. Collectors place a premium on clocks with their original finish. You can use a finish cleaner/restorer. One excellent product is Curator Clock Case Restorer (shown below) that is available from most clock supply houses. Howard Restor-A-Finish also works well on newer (not shellac) finishes. This product is available at most home improvement stores.
- Polishing - Do not polish a metal dial. Most metal dials are silvered. However, do not attempt to polish them with silver polish. In most cases, this silver layer is so thin you will wear through it while polishing it. Use the same care when polishing bezels. Many of these are gilded with a very thin layer of gold. Polishing can easily remove this layer of gold and expose the underlying brass.
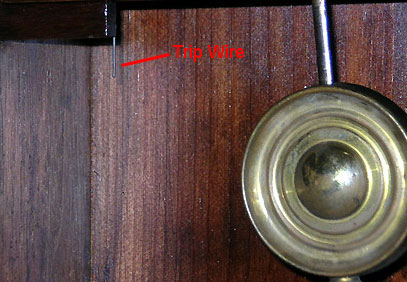
- Synchronizing strike - At times, the strike on your clock may get out of synchronization with the time. This is usually easy to adjust. On clocks where the movement is not very accessible, you may see a wire hanging down to an area that is accessible. (See photo below.) Pulling this wire will trip the strike mechanism. Pull this wire once and let the strike run its course. Repeat this until the strike corresponds to the current time.
On clocks where the movement is accessible, you may need to simply trip the count wheel lever. (This lever is shown in the striking clock movement photo near the top of this article). Simply lift the lever out of the slot that it is in and let the strike run its course. Repeat this until the strike corresponds to the current time.
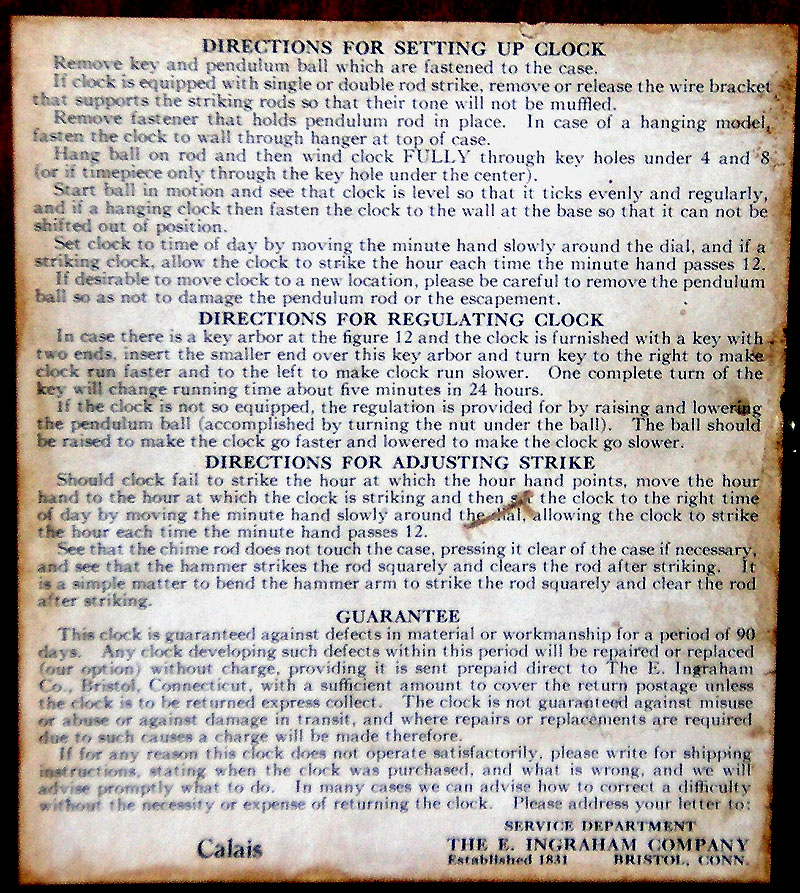
Below you will find a set of instructions provided by the Ingraham Clock company with their striking clocks from the early 1900's.
A Guide to Dating Morbier Clocks, by Ken McWilliams (PDF)